

I've been so busy lately that I have been lagging on the DIY projects. I am 1/2 way done with this chair request I have been working on 1/4 the way done with a painting commission I've been working on, and my house projects have gone to the way-side. Hoping to have NO obligations this weekend and I can relax, create, and clean this weekend.
This I'd like to do soon:
joybx
diy-skeleton-shirt-tutorial
Monday, October 22, 2012
Monday, October 8, 2012
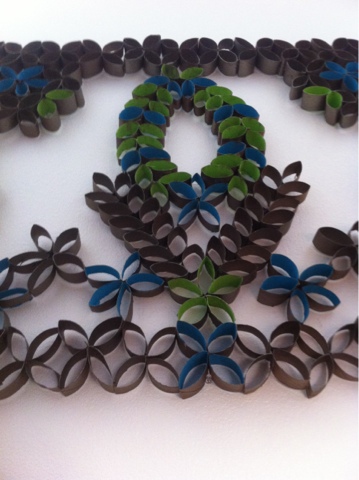
Paper Towel Sculpture
I saw a post on Pinterest on creating 2D sculptures with cut toilet paper rolls. Instantly inspired, I set out to do it myself! Since only had about 4 toilet paper rolls when I began, it wasn't exactly satisfying. However, I have asked friends and family to save their rolls for me and have been saving for about 2 months now and I am ready to get to sculpting. I am looking to do something for the 1/2 way part on my stairs where it looks a little bare.
Inspiration to be more intricate: Click
Here is the start of the gluing... this is about 3-4 toilet paper rolls. Sad... and small.


So, I decided to go bigger!!!! After saving up for months... here is more cut rolls to add...

We first started gluing together 2 pieces, some with 4 pieces, and some with 5 pieces and then set them together to see what kind of shape we could make.


And the finished piece. Hung up, painted, and works wonderfully in my stairwell.
Wednesday, August 22, 2012
INSPIRATION: Toilet paper roll wall art
Tibble Fork: Toilet paper roll wall art: Very inspiring! I started my toilet paper roll piece... and now I'm inspired to do something a bit more intricate!
Cresent and Old Lace

Cresent and Old Lace

Friday, August 17, 2012
Rock Mosaic
I found a cute tutorial on a rock mosaic and decided to create a heart shape out of some river rocks I had picked up for my mom. There weren't enough of either color to do a solid heart so I thought 1/2 and 1/2 would look nice.


I set out the red and green rocks into the pattern I wanted and slowly started to hot glue each one to the circle. (Careful, put something under the circle or the hot glue will bleed through.)

After I completed the mosaic piece, I made a spot for it in her yard, placed it neatly, rang my mother's door bell and ran away. I later texted her to look in her yard just to make sure she saw it :) The white rocks make the heart stand out nicely I think.


Windchime
First I gathered the materials I would need. A wooden letter "E" for her name, some screw hooks to hang the "E" as well as hang each of the strands, some of the metal hooks I used for my mustache pendants [here], beads, sculpty clay skulls (already made from a mold I bought on ETSY [link here]), paint, sparkles, and E-6000 glue to hold it all together.
I painted the "E" and put a piece of scrapbook paper on it with Modpodge (I made this with watered down glue to save some money) to give it a neat texture. While the modpodge was still drying I sprinkled some yellow/gold glitter on to give the piece some contrast.
After the "E" was finished, I drilled out the holes to screw in the screw hooks.
Next came the strands of beads... this was a trial and error processes. I knew this could end up outside so I used some glue to make sure the strands would stay on the metal hooks as well as the strands. I allowed the E-6000 glue to set overnight. In between each of the bead strands I put a strand that had a skull to break up the repetitiveness of the strands and to give it a cool look.

This is what it looked like after drying over night. Excited and almost done I took a day off to clean house.

After finishing the strands, applying the "Apache Tears", adding a skull to the "E" and allowing it all to dry again overnight... I am very satisfied with how it came out. I may do this again for other gifts (if I do... I'll take more step-by-step pictures.)

Subscribe to:
Posts (Atom)

